Introduction
If you’ve done any amount of work with routers, you know that it doesn’t take long to start craving consistency. And more advanced functionality that the cheap home interfaces simply don’t grant you. This is the point where you usually break down and start research things like Tomato, OpenWrt, and DD-WRT, just to name a few of the more popular alternatives.
These alternate firmwares don’t just provide a consistent administrative experience across all compatible models and brands, they also turn a cheap home router into a flexible and competitive enterprise router.
My Setup
DD-WRT is my personal firmware of choice. Powerful, flexible, and stable. One thing that I demand in a router is the ability to broadcast a secondary SSID for my guest’s to be able to access wireless internet in my home without also having access to my entire network of computers and devices.
Gladly, because my router’s firmware was extremely slow and buggy, I flashed my Cisco E2500 router with “mini” DD-WRT firmware (the E2500 also supports the “big” firmware). But after reviewing getting the two wireless networks setup on my router, it was brought to my attention that there are no good tutorials for how exactly you are to do this using DD-WRT. The tutorial provided on their own website, in fact, does not work. So, I find that it falls upon me to put out my particular configuration for two mutually exclusive wireless networks from a single router, both networks having access to the WAN port (that is, internet access). There are, of course, multiple ways to do this. Feel free to leave alternative suggestions in the comments.
Create Two Wireless Networks
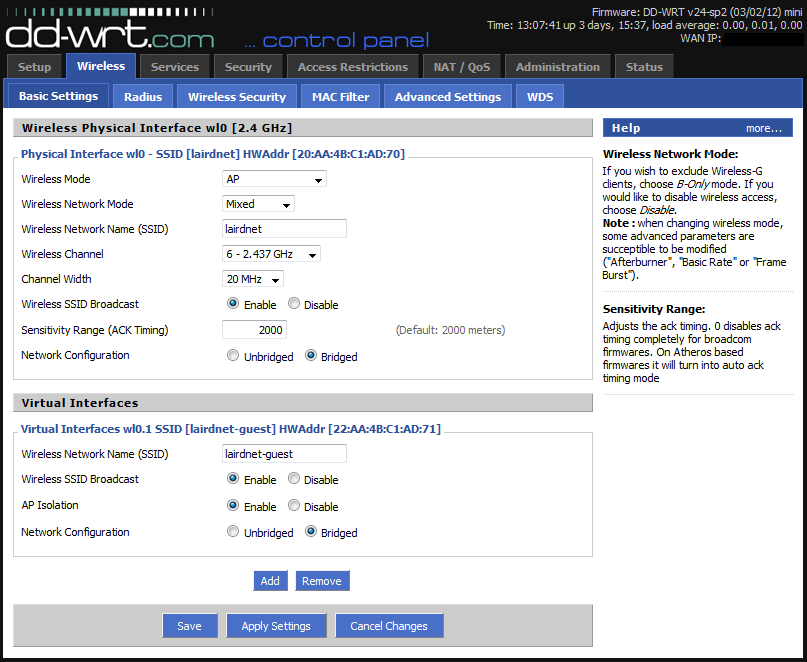
First, create your wireless networks by clicking clicking on “Wireless” and then “Basic Settings”. We’ll setup security in a moment. After you’ve configured your private wireless network setup, click “Add” under “Virtual Interfaces” to add the “wl0.1 SSID”. Give your guest network a separate SSID, and select “Enable” for “AP Isolation”.
Now click “Save” and “Apply Settings”.
Setup Wireless Security
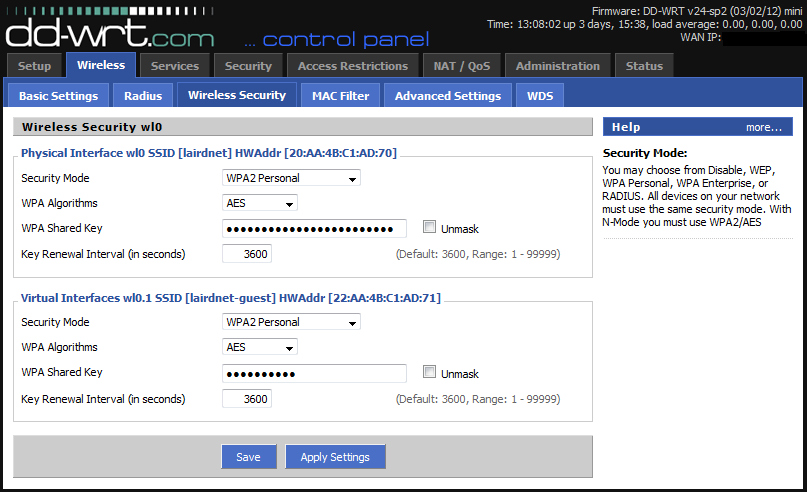
Navigate over to the “Wireless Security” tab. After you’ve setup the wireless security for your private network, setup similar security for your guest SSID. I would advise against leaving your guest wireless completely open, but since you’re going to be giving out this password to your guests, it should probably be a little simpler than your private network’s key.
Now click “Save” and “Apply Settings”.
Create Bridge
At this point, you have two wireless networks broadcasting on two separate SSIDs. Both networks should have internet access, but you’ll also notice both networks dish out IPs in the same subnet, and both networks are clearly able to see each other. While you may like and trust your guests, that doesn’t mean you necessarily want them to have access to all your network devices. To separate the network routing, we need to create a bridge and place the guest network into a different subnet.
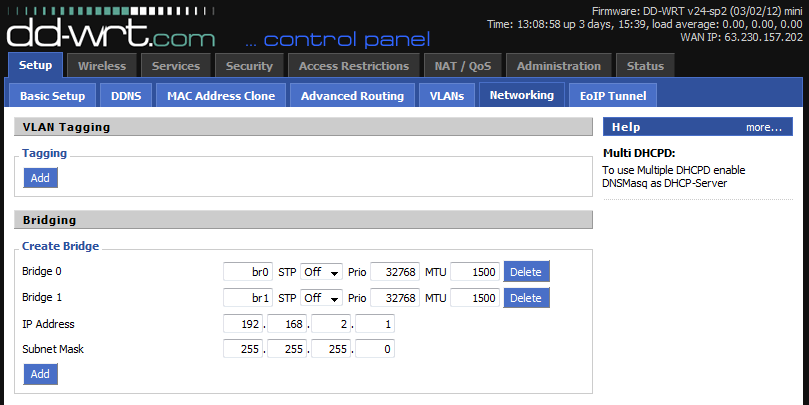
Click on “Setup” and then on the “Networking” tab. Under “Create Bridge” click “Add” to add a new bridge. Give the bridge a name, and modify the IP address of the bridge to be in a different subnet than your private network. For example, my private network grants IPs in the subnet 192.168.1.0/24, so my guest network in the image below is setup to grant IPs in the subnet 192.168.2.0/24.
Now click “Save” and “Apply Settings”. Though the page may refresh right away, you may need to wait about a minute before the bridge is available to use in the next few steps.
Assign Guest Network to Bridge
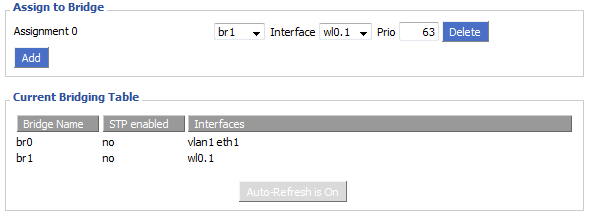
Under “Assign to Bridge” click “Add”. Select the new bridge you’ve created from the first drop-down, and pair it with the “wl0.1″ interface.
Now click “Save” and “Apply Settings”.
Create DHCP Server for Guest Network
We’re almost there! We’ve created a bridge in an alternate subnet, but the alternate subnet doesn’t have a DHCP server, so our guests currently cannot access the guest SSID (unless they assign themselves a static IP). Scroll to the bottom of the “Networking” page and under “Multiple DHCP Server” click “Add”. Ensure your newly created bridge name is selected from the first drop-down menu.
Now click “Save” and “Apply Settings”. Congratulations, we now have a working, separate guest network! Unfortunately, while users can connect to the network and DHCP is running, guest users aren’t able to access the internet quite yet.
Create Firewall Rules for Guest Network
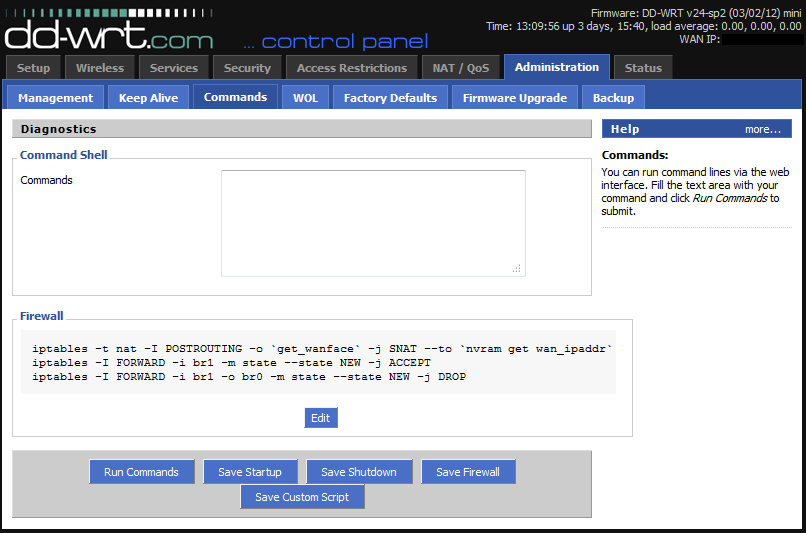
Navigate to the “Administration” tab and click on “Commands”. We need to add three rules to our firewall settings before our private network is completely secure and our guest network has internet access. Add these three rules (one per line) to the “Commands” text field, then click “Save Firewall” to ensure the rules execute even after the router is rebooted.
|
1
2
3
|
iptables -t nat -I POSTROUTING -o `get_wanface` -j SNAT --to `nvram get wan_ipaddr`iptables -I FORWARD -i br1 -m state --state NEW -j ACCEPTiptables -I FORWARD -i br1 -o br0 -m state --state NEW -j DROP |
Improve Guest Security
Pete Runyan commented with a few more ways to nail down the security of the guest network. For one, your guests likely assume that their device on the guest network is not accessible from other devices on the same network, so you’ll want to add the firewall rules below to make that true. It’s also probably unnecessary (depending on your needs) to allow users on the guest network SSH, Telnet, or GUI access to the router. Append these firewall rules to harden the security of all of your networks!
|
1
2
3
4
5
|
iptables -I FORWARD -i br0 -o br1 -m state --state NEW -j DROPiptables -I INPUT -i br1 -p tcp --dport telnet -j REJECT --reject-with tcp-resetiptables -I INPUT -i br1 -p tcp --dport ssh -j REJECT --reject-with tcp-resetiptables -I INPUT -i br1 -p tcp --dport www -j REJECT --reject-with tcp-resetiptables -I INPUT -i br1 -p tcp --dport https -j REJECT --reject-with tcp-reset |
Conclusion
You should now have two working SSIDs: a private one for your home network, and a guest network for your visitors. Both networks should have internet access. The private network will function the same as a LAN and single wireless network did before, with the wireless network having full access to the LAN connections. The guest network, on the other hand, is separated from the private network. Additionally, each individual device on the guest network is separate from another, so guests cannot see each other.
If you’ve gotten to this point and something is not working, or your guest network does not have internet access, don’t be alarmed. DD-WRT is a always evolving, and it’s entirely possible bridge settings or firewall rules for the latest build have changed. If this tutorial does not produce the desired result, please leave a comment below. I’ll try to always keep the tutorial updated with instructions for the latest DD-WRT build.
Use DD-WRT to Create a Guest WiFi Network and Block Skype

Even for the extremely ungeeky, having WiFi available throughout your house is pretty much standard these days. And while the next logical step of securing that network via encryption (WEP is for n00bs — those in the know use WPA2-AES) may not be standard, it really should be. Assuming you do have a WiFi password at your house, the notion of freely sharing your WiFi password anyone who shows up at your house is so 2009. If you truly want to bring your geeky hospitality to a whole new level, it’s time to consider setting up a “guest-only” network for your wireless router.
A number of modern wireless routers come with out-of-the-box support for guest networks, but still limit the amount of control you have in configuring them. As a long-time user of “hacked” third-party open source router firmware (such as Tomato and DD-WRT), the ability to run those firmwares is an essential requirement when I purchase a router, and the installation of an open source firmware is the first thing I do when I take it out of the box.
Doing the things I’m describing in this post requires that a semi-recent build of DD-WRT be running on your wireless router. If you don’t know what DD-WRT is, find your resident geek and ask them if installing it on your router is even an option (it will only work on certain hardware). Keep in mind that installing third-party firmware improperly and/or on unsupported hardware can “brick” your router (i.e. make it as useful as a brick), so rookies should study up big time by reading the appropriate wiki entries and threads on the DD-WRT website before trying it for the very first time. Seriously. Please don’t comment on this article that “I” ruined your router because you didn’t RTFM. So now that my conscience is clear, let’s proceed.
Rather than re-post the instructions for getting a 2nd WiFi network running at your house, I’ll simply refer you to the instructions on the DD-WRT website. The process is called setting up a 2nd WLAN (Wireless Local Area Network).
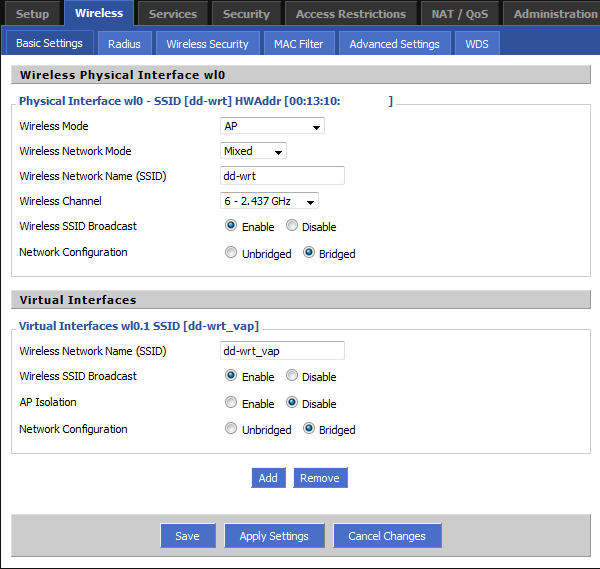
At our house, I set up a “private” WiFi network for immediate family members only, which requires a password that we don’t share with anyone else. This allows family members to access shared network resources (both wired and wireless) in the house, such as printers, NAS media storage devices, security cameras, DVRs, home automation tools, AirPlay-capable audio devices, AppleTV, etc.
Additionally, I’ve set up a “public” WiFi network for guests to use, and which doesn’t require any password. With two separate networks, I can configure separate sets of rules to make things more usable and secure across both networks. For example, I’ve configured QoS (Quality of Service) settings that give bandwidth priority to the private network — meaning that if I’m trying to watch something on Netflix at the same time one of my guests is trying to download a huge file, my Netflix experience is unaffected while they’ll have to wait a bit longer for their file. I’ve also applied a number of firewall rules to my guest network so that guests can’t access the network resources on my private network, nor than they run network scans to try and discover the IP addresses or MAC addresses of network devices. Want to try that the next time you’re connected to a public network? Download the free Fing app onto your iPhone or Android device and see what kind of data you can collect at the click of a button. It’s downright scary.
But perhaps the ability I appreciate the most is the option to to block access to certain remote resources for those on the guest network, such as Skype. As an example, let’s take a completely hypothetical situation. Let’s assume that your wife’s sister’s family, who recently moved from Seattle to Casper, Wyoming, is driving to meet you at your vacation home in Utah, where four adults and eight kids will all spend their Christmas and New Year’s vacation together. Let’s also assume that your 17-year old nephew has his very first girlfriend, but that she still lives back in Seattle, and that those crazy kids spend hour… after hour… after hour… on their smart phones logged in to Skype — and sometimes they just stare at each other and don’t even talk. It’s hypothetically creepy. Then again, let’s assume that sometimes they do talk… for hours… and hours… even past midnight when the nephew should be sleeping, and let’s further assume that he’s sharing your son’s bedroom, which is directly below yours, and that his late night Skype marathons are keeping you, your wife, and your son awake late into the night, which makes you grumpy in the morning. Like I said — completely hypothetical.
With most applications, the solution would be easy. Just go into your router’s firewall and shut down the ports used by the application that you want to block. But because Skype uses ports 80 and 443, which are the standard ports used by nearly every website on the Internet, shutting those ports down would essentially mean shutting down access to the entire web for all users on the guest network… which kind of defeats the purpose of having a guest network in the first place. To make matters worse, Skype is a “peer to peer” (P2P) service, meaning that Skype users connect directly to one another, usually on remote dynamic addresses (which change often), meaning there’s no way to predict and block the IP address of the remote user.
Web searching for a solution uncovered a number of extremely complex potential anwers, most of which involved the use of proxy servers, deep packet inspection, and a bunch of other stuff that I really didn’t want to get into. Er… I mean, things I wouldn’t want to get into were this something other than a completely hypothetical scenario.
However, there is a small chink in Skype’s armor… its Achilles Heel, if you will. Prior to establishing a peer-to-peer connection with another Skype user, you first need to sign in to one of Skype’s authentication servers with your username and password. The authentication servers store your contact list, your chat history, and serve as the launching pad for all Skype chats. Best of all, finding a list of Skype’s authentication server IP addresses only took a few seconds with search engine.
With Skype’s authentication server IP addresses in hand, blocking access to them becomes as simple as writing a Linux firewall script to restrict access to them from the guest network. Again, this technically doesn’t shut down the ability for the chat to take place, it shuts down the ability to start the chat, but it accomplishes the same goal. Here’s what such a firewall command would look like, hypothetically, of course:
iptables -I FORWARD -i br1 -d 111.221.74.0/24 -j DROP
In English, that means that you want to insert (-I) a FORWARD chain rule that says any traffic coming in to the router (-i) from the guest network bridge (br1) that tries to go to any destination (-d) IP address that starts with the numbers 111.221.74 should be ignored (-j DROP).
Therefore, adding one of these lines to your firewall script for each of Skype’s subnets would hypothetically do the trick. Of course, if a marathon Skype chat was already underway, this wouldn’t end it — this approach only stops new chats from starting. So to stop a chat that’s already progress, you’d hypothetically have to briefly shut off the guest WiFi network for a couple of seconds and then turn it back on, temporarily dropping all network access, would would hypothetically frustrate your nephew when he tries to re-initiate a Skype chat with his girlfriend. But you’d hypothetically be able to finally get some decent sleep during your Christmas vacation, which would hypothetically be worth the trouble.
So, if you wanted a list of firewall rules for your router that could hypothetically secure your guest network and shut down access to all the Skype authentication servers, here’s what that script would look like, with comments embedded to help you understand what each line is doing:
#Enable NAT on the WAN port to correct a bug in builds over 17000 iptables -t nat -I POSTROUTING -o `get_wanface` -j SNAT --to `nvram get wan_ipaddr` #Allow br1 access to br0, the WAN, and any other subnets (required if SPI firewall is on) iptables -I FORWARD -i br1 -m state --state NEW -j ACCEPT iptables -I FORWARD -p tcp --tcp-flags SYN,RST SYN -j TCPMSS --clamp-mss-to-pmtu #Restrict br1 from accessing br0 iptables -I FORWARD -i br1 -o br0 -m state --state NEW -j DROP #Restrict br1 from accessing the WAN subnet iptables -I FORWARD -i br1 -d `nvram get wan_ipaddr`/`nvram get wan_netmask` -m state --state NEW -j DROP #Restrict br1 from accessing the router's local sockets iptables -I INPUT -i br1 -m state --state NEW -j DROP #Allow br1 to access DHCP on the router iptables -I INPUT -i br1 -p udp --dport 67 -j ACCEPT #Allow br1 to access DNS on the router iptables -I INPUT -i br1 -p udp --dport 53 -j ACCEPT iptables -I INPUT -i br1 -p tcp --dport 53 -j ACCEPT #Block br1 from accessing Skype authentication servers iptables -I FORWARD -i br1 -d 111.221.74.0/24 -j DROP iptables -I FORWARD -i br1 -d 111.221.77.0/24 -j DROP iptables -I FORWARD -i br1 -d 157.55.130.0/24 -j DROP iptables -I FORWARD -i br1 -d 157.55.235.0/24 -j DROP iptables -I FORWARD -i br1 -d 157.55.56.0/24 -j DROP iptables -I FORWARD -i br1 -d 157.56.52.0/24 -j DROP iptables -I FORWARD -i br1 -d 194.165.188.0/24 -j DROP iptables -I FORWARD -i br1 -d 195.46.253.0/24 -j DROP iptables -I FORWARD -i br1 -d 213.199.179.0/24 -j DROP iptables -I FORWARD -i br1 -d 63.245.217.0/24 -j DROP iptables -I FORWARD -i br1 -d 64.4.23.0/24 -j DROP iptables -I FORWARD -i br1 -d 65.55.223.0/24 -j DROP
Feel free to borrow and edit that file to your liking, just in case you ever need it. Hypothetically, of course
LINKS:
Use DD-WRT to Create a Guest WiFi Network and Block Skype
Share Your Wireless Network With Guests

