Windows 10 software updates install on your device automatically (whether you like it or not), but this guide can help you retake control and decide when to install them.
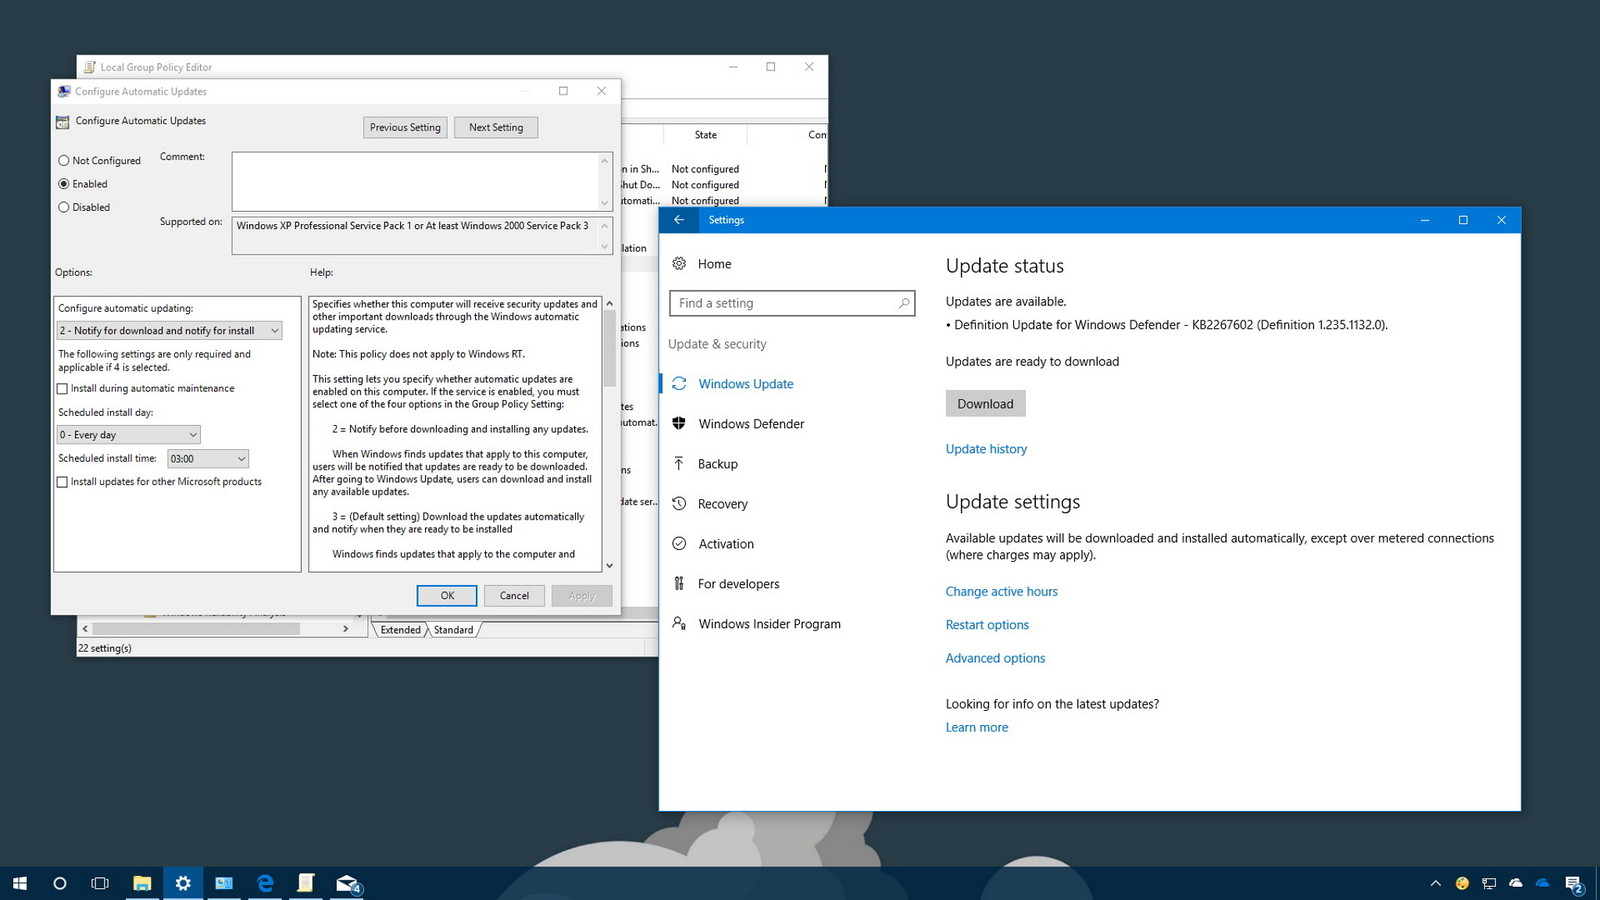
On Windows 10, you no longer have absolute control over software updates. They're mandatory, and they download and install automatically to ensure your device stays up to date with the latest security patches and improvements. This approach is convenient for many users, but it's not one that everyone wants.
If you're running Windows 10 Pro or higher, it's possible to retake control and prevent the OS from downloading and installing updates automatically using the Local Group Policy Editor or the Registry.
In this Windows 10 guide, we'll walk you through the steps to prevent updates from automatically installing on your computer.
- How to prevent automatic updates using the Local Group Policy Editor
- How to prevent automatic updates using the Registry
How to prevent automatic updates using the Local Group Policy Editor
If you run Windows 10 (Professional, Enterprise, or Education ), you can use the Local Group Policy Editor to quickly change the settings to prevent Windows 10 from automatically downloading and installing updates.
Here's how to change the Local Group Policy Editor settings:
- Use the Windows key + R keyboard shortcut to open the Run command.
- Type gpedit.msc and click OK to open the Local Group Policy Editor.
-
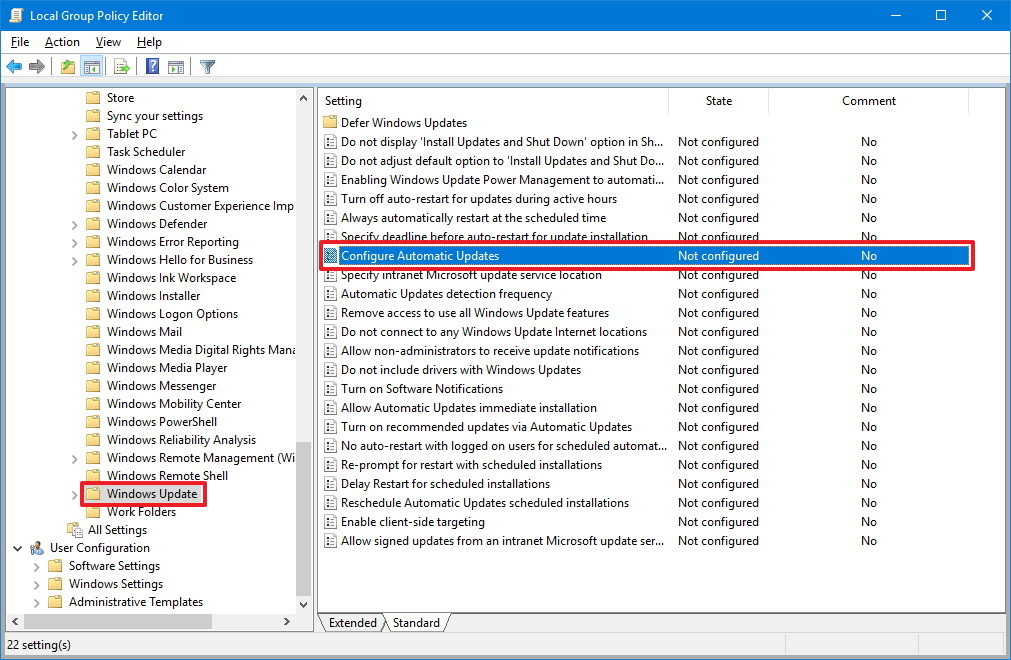
Browse the following path:
Computer Configuration\Administrative Templates\Windows Components\Windows Update -
On the right side, double-click the Configure Automatic Updates policy.
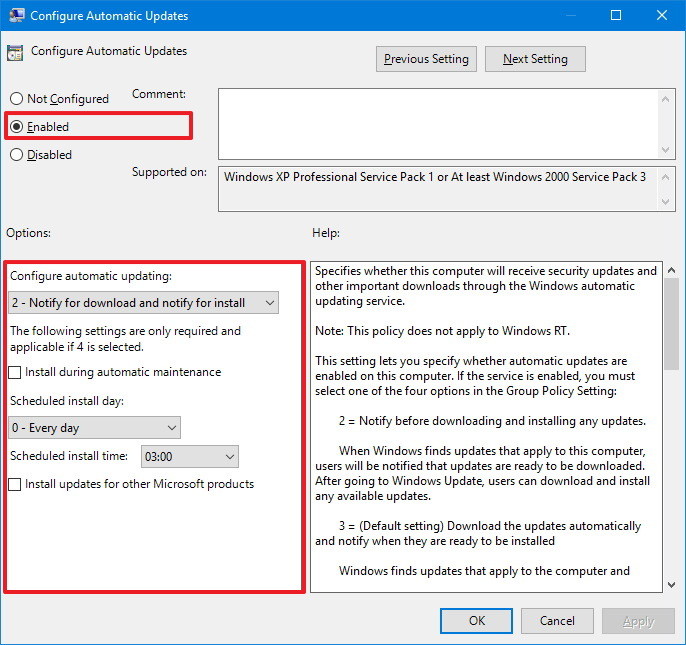
- On the left side, check the Enabled option to enable the policy.
-
Under Options, you'll find a number of ways to configure automatic updates, including:
- 2 – "Notify for download and notify for install."
- 3 – "Auto download and notify for install."
- 4 – "Auto download and schedule the install."
- 5 – "Allow local admin to choose setting."
You should select the update option you want to configure. If you select option 4, you can specify exactly when to install new updates. You can also choose to install updates during automatic maintenance, on a particular day and time, and you can even check the option to include other Microsoft product updates when updating the OS.
- Click Apply.
- Click OK to complete the task.
While you can pick from any of the available options, your best choice is probably 2 – Notify for download and notify for install. This option will not only prevent the OS from downloading updates automatically, which can save you data when using a metered internet connection, but you'll get a notification when new updates are available.
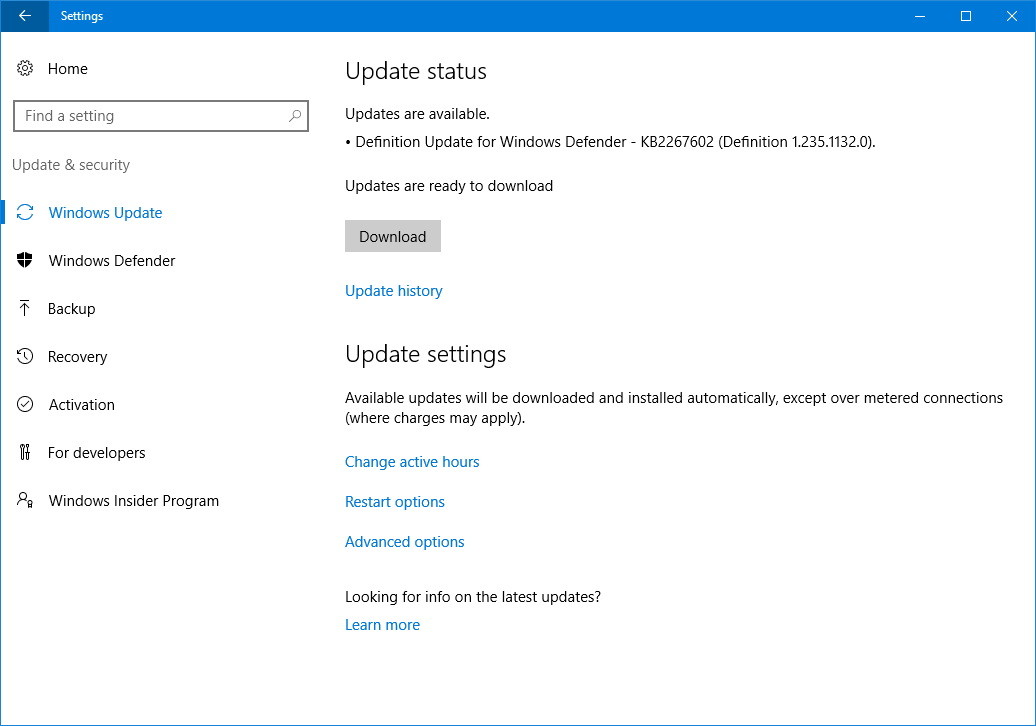
When new updates are released, you'll receive a notification in Action Center, but updates won't download and install until you're ready and do the following:
- Open Settings.
- Click on Update & security.
- Click on Windows Update.
-
Click the Download button.
- Click the Restart button to complete the task.
How to prevent automatic updates using the Registry
Instead of using the Local Group Policy Editor, you can also change the Windows 10 updates using the Registry.
Important warning: Editing the registry is risky, and it can cause irreversible damage to your installation if you don't do it correctly. It's recommended that you make a full backup of your computer before proceeding.
- Use the Windows key + R keyboard shortcut to open the Run command.
- Type regedit, and click OK to open the Registry.
-
Browse the following path:
HKEY_LOCAL_MACHINE\SOFTWARE\Policies\Microsoft\Windows -
Right-click the Windows (folder) key, select New, and then click Key.
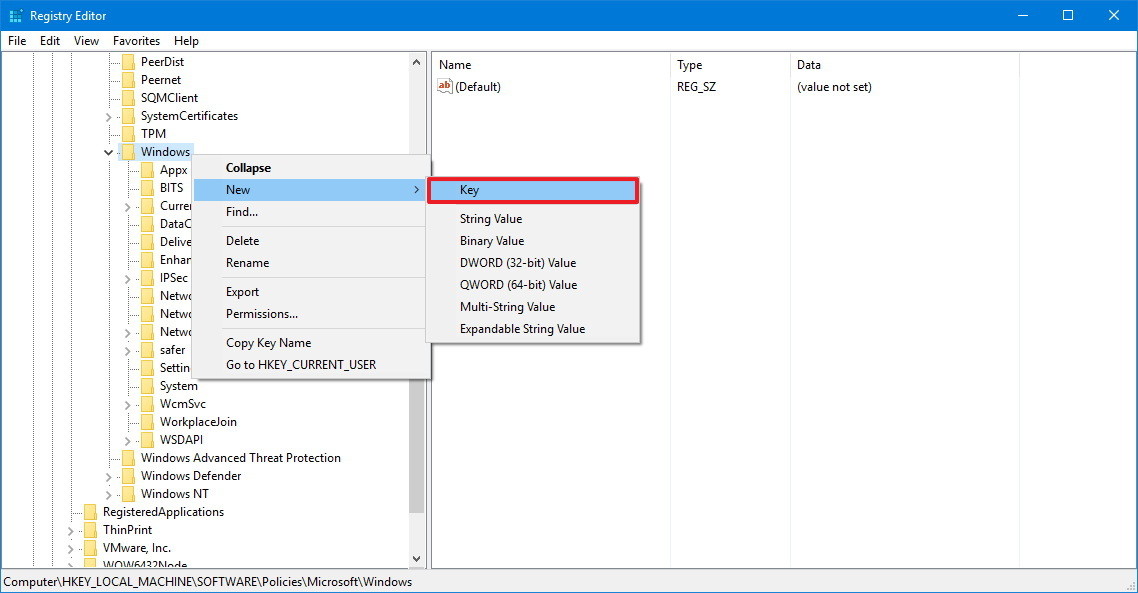
- Name the new key WindowsUpdate and press Enter.
-
Right-click the newly created key, select new, and click Key.
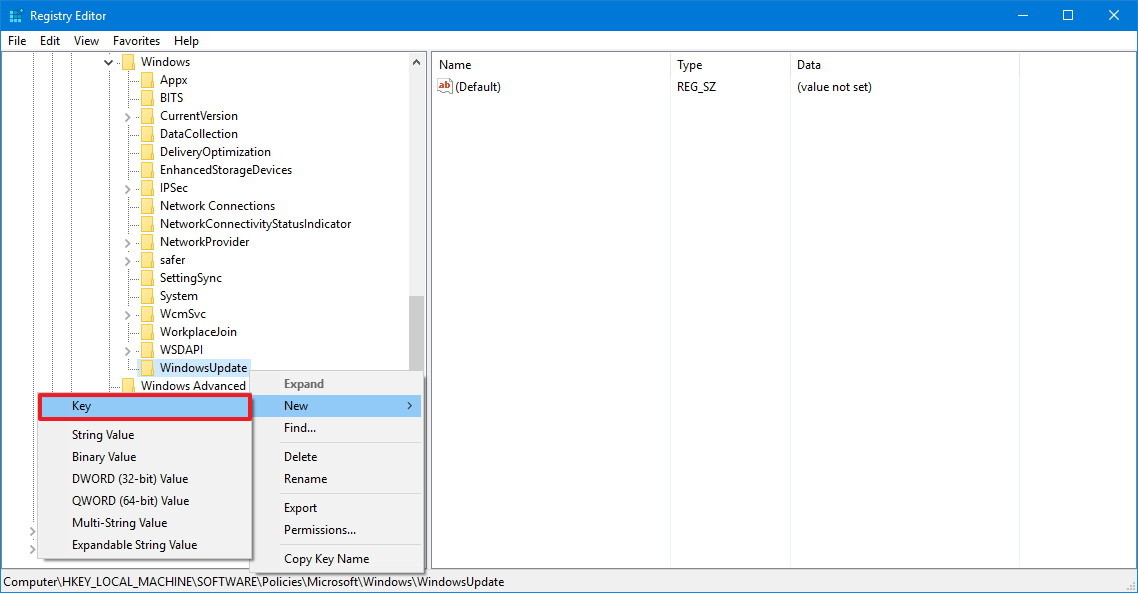
- Name the new key AU and press Enter.
-
Inside the newly created key, right-click on the right side, select New, and click on DWORD (32-bit) Value.
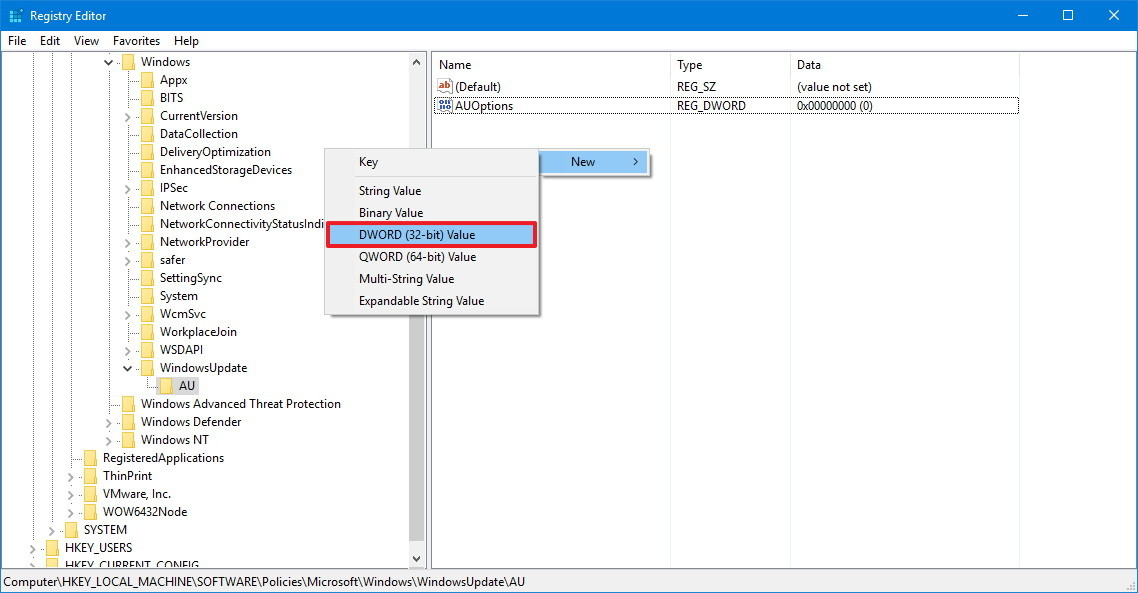
- Name the new key AUOptions and press Enter.
-
Double-click the newly created key and change its value using one of the following options:
- 2 – "Notify for download and notify for install."
- 3 – "Auto download and notify for install."
- 4 – "Auto download and schedule the install."
- 5 – "Allow local admin to choose settings."
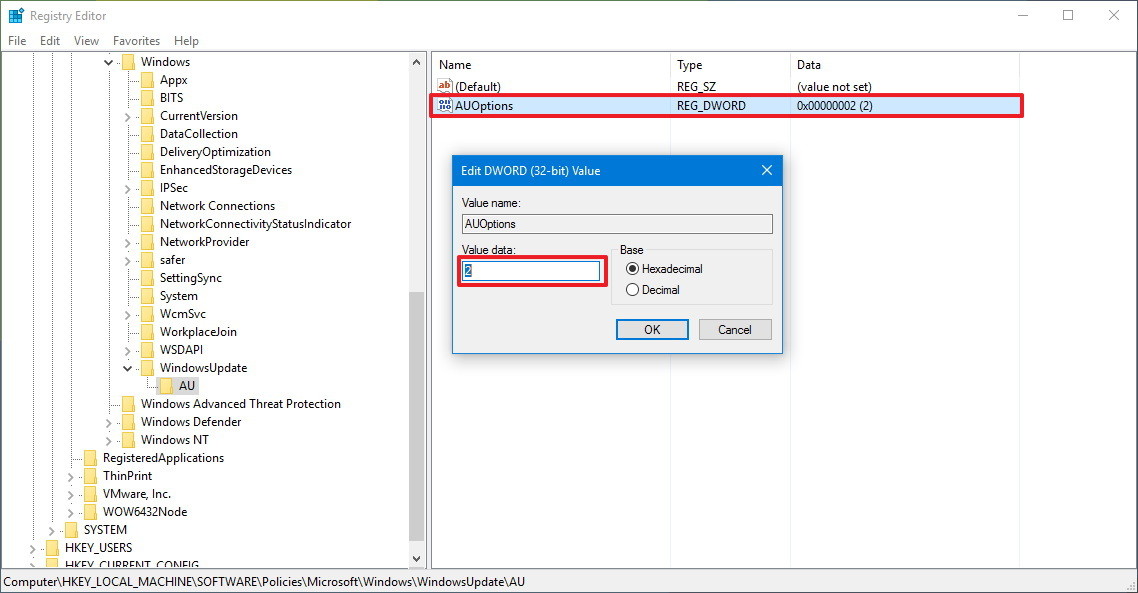
- Click OK.
- Close the Registry to complete the task.
Although you can use any of these available values, your best choice is to change the value to 2 to configure the "Notify for download and notify for install" option. Using this value prevents Windows 10 from downloading updates automatically, and you'll get a notification when new updates are available.
After tweaking the Registry, when new updates become available, you'll receive a notification in Action Center, but updates won't download and install until you're ready and do the following:
- Open Settings.
- Click on Update & security.
- Click on Windows Update.
-
Click the Download button.

- Click the Restart button to complete the task.
Wrapping things up
The steps mentioned in this guide are meant to prevent regular updates that patch security vulnerabilities and improve the overall performance of Windows 10. If you're looking to prevent the OS from installing feature updates, such as the Windows 10 Fall Creators Update, you need to use this guide to defer major updates.
We do not recommend using a computer without the latest updates, because they're often key to keeping your Windows 10 PC running properly. However, there will be times when you may want to manually apply new updates, when you want to install them during a particular time, or because you want to wait until you're sure the update will not cause issues.
If you only want to prevent your computer from restarting when you're actively using it you can configure Active Hours in the Settings app.
