
Nowadays we have more and more multimedia devices at home
In my case I have: file shares, Raspberry Pi devices for specific projects, home automation and computers
Did you already ask yourself how to access them while not at home?
It’s possible if you set up a VPN server, even on a Raspberry Pi
How to install your own VPN server on Raspberry Pi?
You need to install a free service on your Raspberry Pi: OpenVPN
This will allow you to use home resources from anywhere via an app on your client
The app is available on any operating system, even on your smartphone
I’ll explain what a VPN is, how it works and how to install it on a Raspberry Pi step-by-step
If you’re familiar with VPN topics, use the table of contents below to move directly to the step you are interested in
Table of Contents
What’s a VPN?
Before going further, let’s start with a few reminders about VPN
Introduction
VPN stands for Virtual Private Network
And that’s exactly what it is. When connected to a VPN, it’s as if you were on a private network between you and the VPN server
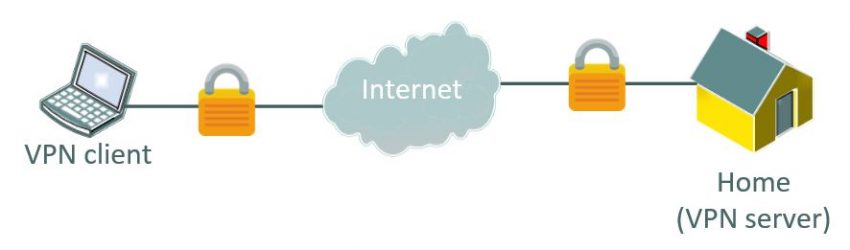
The main goal of a VPN is to encapsulate your data in a secure tunnel between you and the VPN server
Let’s take an example
If you share a web server at home with port forwarding (public_ip:80 => local_ip:80), data could be accessible to hackers, as data flows in clear on the network (man in the middle attacks are possible)
If you use a VPN server on your Raspberry Pi, data flows in the secure tunnel, so nobody can decrypt them
The goal of this tutorial is to create a secure tunnel between you (from anywhere in the world) and your local network at home

How it works
I won’t bother you with details concerning data encryption technology
But here is what you need to know:
- We need to install a new software on the client computer to encrypt data
- On this client, we also have keys coming from the server to encrypt data in a way that only the VPN server can understand
- In the client configuration, we’ll tell the software to connect to the VPN server public IP address
- When the encrypted data arrives to the VPN server, the server software will decrypt it and know what to do with it
- Same thing for packets coming from the home network to the VPN client
So we don’t need a lot of things, just to install software on each side of your secure tunnel
OpenVPN
OpenVPN is the free software we’ll use to do this
It provides client and server parts, for all operating systems
More precisely, we need to install:
- OpenVPN server, on our Raspberry Pi at home
- OpenVPN client, on our laptop computer or smartphone, to access home resources from anywhere
How to install OpenVPN on Raspberry Pi
You now understand how it works and what we need to do
Let’s go to the technical part!
Raspberry Pi side
Prerequisites
Here is what you need to start this guide:
- A Raspberry Pi (tested on Zero, so any model should work)
- Raspbian installed (Follow this tutorial to install Raspbian if not already done)
- Administrator access to your Internet router or firewall (for port forwarding)
- A static public IP address if possible or a dynamic host (I don’t have a static IP, so I’m using No-IP)
OpenVPN installation
Let’s move to the OpenVPN installation procedure:
- I recommend switching to the root user because you’ll type a lot of commands in this procedure that need root privileges
-
sudo su
-
- Start by updating your system
-
apt update -
apt upgrade
-
- Install the OpenVPN package
-
apt install openvpn
-
- Extract the sample configuration file to the OpenVPN folder
-
gunzip -c /usr/share/doc/openvpn/examples/sample-config-files/server.conf.gz > /etc/openvpn/server.conf
-
- Edit this file
-
nano /etc/openvpn/server.conf
-
- Make these changes
- Comment out this line
-
push "redirect-gateway def1 bypass-dhcp"
-
- Comment this one (we don’t need TLS authentication for the first try)
-
;tls-auth ta.key 0
-
- Edit the DNS server to fit your needs
-
push "dhcp-option DNS 8.8.8.8"
In my case, I’m using the Google DNS Server (8.8.8.8) but set what you want
Let the default option if you don’t know what it is
You can also set a second DNS server in the line above -
- Comment out the user and group options
-
user nobody -
group nogroup
-
- Comment out this line
- Save and exit (CTRL+O, CTRL+X)
We’ll come back to this configuration file later, for the moment it’s fine
Allow IP Forwarding
By default, Linux doesn’t allow IP forwarding
As our Raspberry Pi will be the router between VPN clients and the local network, we have to enable it
- Paste this command to enable it immediately
-
echo 1 > /proc/sys/net/ipv4/ip_forward
-
- Then open this file to enable it on boot
-
nano /etc/sysctl.conf
-
- Comment out this line
-
net.ipv4.ip_forward=1
-
- Save and exit (CTRL+O, CTRL+X)
Your Raspberry Pi can now act as a router
Easy-RSA configuration
The next step is to generate all the keys on the server side to secure the connection
Easy-RSA will help us for this part
- Copy Easy-RSA files to the OpenVPN configuration folder
-
cp -r /usr/share/easy-rsa/ /etc/openvpn
-
- Create a new sub-folder for the keys
-
mkdir /etc/openvpn/easy-rsa/keys
-
- Edit the vars file to set your preferences
-
nano /etc/openvpn/easy-rsa/vars
-
Change the KEY_CONFIG option to use this syntax instead
- export KEY_CONFIG=$EASY_RSA/openssl-1.0.0.cnf
I had issues with this line, this one works with my 1.1.0j OpenSSL version
If you have another version, check in the easy-vars/ folder if you have a file closer from your version, and edit this line
- Fill the other KEY options with your own information, for example:
-
export KEY_COUNTRY="US"
-
export KEY_PROVINCE="CA"
-
export KEY_CITY="Los Angeles"
-
export KEY_ORG="Raspberry Tips"
-
export KEY_EMAIL="email@domain.com"
-
export KEY_OU="Raspberry Tips"
-
- Then set the KEY_NAME like this
-
export KEY_NAME="server"
This is just for the key file name
-
-
- Save and exit (CTRL+O, CTRL+X)
Once the vars file is properly set, we can start with keys generation
Generate the keys
Now we use dhparam to generate the Diffie-Helman file
- openssl dhparam -out /etc/openvpn/dh2048.pem 2048
This may take a long time (One hour on Pi Zero!)
Then we move to the last steps with the server keys generation
- Check you’re always in the easy-rsa folder (and using root)
-
cd /etc/openvpn/easy-rsa
-
- Run the initialization step
-
. ./vars
The first dot is normal, never seen that, but it works 🙂
-
- Clean the folder (don’t pay attention to the warning you got before)
-
./clean-all
-
- Build CA
-
./build-ca
-
- If it works, fine, you’re lucky
In my test, I got errors about files missing in the keys sub-folder
Copying them from the examples directory fixed this issue-
cp /usr/share/doc/openvpn/examples/sample-keys/sample-ca/index.txt keys/ -
cp /usr/share/doc/openvpn/examples/sample-keys/sample-ca/index.txt.attr keys/ -
cp /usr/share/doc/openvpn/examples/sample-keys/sample-ca/serial keys/
Then redo the previous command and it should be fine
-
- Finally, generate the server keys with:
-
./build-key-server server
Let all fields by default, and password and company name empty
Answer yes to both questions -
That’s it, the work is almost done
We just need to move the keys to the OpenVPN configuration folder and start the service
- Copy the keys under the configuration folder
-
cp /etc/openvpn/easy-rsa/keys/ca.crt /etc/openvpn -
cp /etc/openvpn/easy-rsa/keys/server.crt /etc/openvpn -
cp /etc/openvpn/easy-rsa/keys/server.key /etc/openvpn
-
- Start (or restart) the service
-
service openvpn start
-
- Check if everything seems ok
-
service openvpn status
-
Wow, good work
You finish the server part, we now need to create the client configuration
Client
The remote client also needs keys to secure the connection with the server
We’ll create them now
- It’s like what we did for the server, run this command to start:
-
cd /etc/openvpn/easy-rsa/ -
./build-key client1
Keep all the default values (hit enter for each question)
And answer yes for the two last questions -
- Then copy the sample configuration file
-
cp /usr/share/doc/openvpn/examples/sample-config-files/client.conf /etc/openvpn/easy-rsa/keys/client.ovpn
-
- Edit this file to set your network preferences
-
nano /etc/openvpn/easy-rsa/keys/client.ovpn
-
- Find this line
-
remote your_server_ip 1194
-
- Edit with your static public IP address, or your dynamic host name
For example:-
remote myhost.ddns.net 1194
-
- Comment out user and group
-
user nobody -
group nogroup
-
- Save and exit
The client configuration is almost ready
Create a unified configuration file
You can use directly all the files generated (client.ovpn with ca.crt, client.crt, client.key)
But I prefer to have only one file with all the keys inside, it’s easier to import it on the client (especially for smartphones)
To do this, follow this procedure:
- Open the configuration file again
- Comment this lines
-
;ca ca.crt -
;cert client.crt -
;key client.key -
;ta ta.key
-
-
Save and exit
- Then run these commands to integrate the key inside
-
echo '<ca>' >> /etc/openvpn/easy-rsa/keys/client.ovpn
-
cat /etc/openvpn/ca.crt >> /etc/openvpn/easy-rsa/keys/client.ovpn -
echo '</ca>' >> /etc/openvpn/easy-rsa/keys/client.ovpn
-
echo '<cert>' >> /etc/openvpn/easy-rsa/keys/client.ovpn
-
cat /etc/openvpn/easy-rsa/keys/client1.crt >> /etc/openvpn/easy-rsa/keys/client.ovpn -
echo '</cert>' >> /etc/openvpn/easy-rsa/keys/client.ovpn
-
echo '<key>' >> /etc/openvpn/easy-rsa/keys/client.ovpn
-
cat /etc/openvpn/easy-rsa/keys/client1.key >> /etc/openvpn/easy-rsa/keys/client.ovpn -
echo '</key>' >> /etc/openvpn/easy-rsa/keys/client.ovpn
-
And it’s ready
I’ll show you in the next section how to use this configuration file on any device
Port forwarding
As you may have seen in the server.conf, the OpenVPN server is listening on the port 1194
To access it from another location, you need to enable IP forwarding in your Internet router configuration
That’s to say, redirect <your_public_ip>:1194 to <your_raspberry_ip>:1194
I can’t help you more about this, it all depends on your router software
You’ll often find a NAT configuration page in the advanced options
Ask your Internet provider support if you don’t know how to do this
Client installation
OpenVPN is available for all devices with any operating system, even smartphones
Don’t forget, you need to be out of the local network to test the connection
Use a mobile connection while testing
Desktop
On desktop devices, OpenVPN is available for free from the community section of the official website
You’ll find downloads for Linux or Windows
For both operating systems, you need to transfer the client.ovpn file from the Raspberry Pi to the computer (use WinSCP or Filezilla to do this)
For Windows
- Download the file from the OpenVPN website
- Install it following the setup wizard
- Find the OpenVPN GUI in the start menu and launch it
- Right click on the icon in the notification panel
![vpn gui icon]()
- Select “Import file” and select the client.ovpn file

For Linux
- You have two choices for the installation:
- With a Debian like distribution: use apt to install OpenVPN
-
apt install openvpn
On a Redhat like distribution, you can use yum the same way
-
- For others cases, download the sources from the official website, and follow the documentation
- With a Debian like distribution: use apt to install OpenVPN
- Then to connect you have also two choices
- With desktop distributions, look in your network manager if you have a VPN tab to set the configuration
- Or use the command line
-
sudo openvpn client.ovpn
-
I don’t have a Mac to give you the procedure on Mac OS
I’ll let you follow this documentation from OpenVPN
Android / iOS
On your smartphone, you can find the “OpenVPN Connect” app in the Android or iOS app store
Install it, then go to “OVPN profile” and import your client configuration file
The easiest way is to send the file to you by email and download it from your email client
Then browse your local storage to the Downloads folder, and import the file
Note about network routing
Once connected from a remote device, you can access the Raspberry Pi hosting the VPN server
But you may not able to access other devices on your local network
Your local network differs from the VPN clients network
In my case, my local network is 192.168.1.0, and my VPN network is 10.8.0.0 (default)
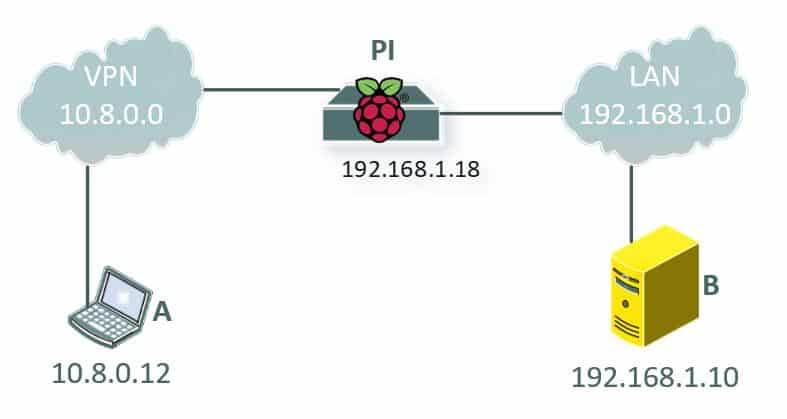
A could see the Raspberry Pi, B too, but A could not see B
In fact, local devices doesn’t know how to talk to VPN clients
You need to create a route between them, to tell that 10.8.0.0 is accessible through the Raspberry Pi
If the main router on your local network can do this, add a static route
If not, you need to add this route on every device in your local network
On Linux/Mac:
-
route add -net 10.8.0.0 netmask 255.255.255.0 gw 192.168.1.18
Change the values to match your server.conf settings
On Windows:
-
route -p ADD 10.8.0.0 MASK 255.255.255.0 192.168.1.18
This solution is fine if you only have computers or servers to access through the VPN connection
But for other devices I didn’t look for a solution (if you know how to do this in another way, please leave a comment)
Related questions
Is it possible to use it in the other way, to secure the outgoing traffic? Not really. There is a way to use your Raspberry Pi as an anonymizer gateway using Tor or any VPN offer in the market. But it has nothing to do with what we did. It’s another project where the Raspberry Pi will be the client, not the server
Is it possible to have multiple clients? Yes absolutely. You just need new configuration file and keys for each client. Repeat the client configuration steps above to generate multiple ovpn files.
Conclusion
Congratulations if you made everything work as expected
It was not an obvious tutorial, but it’s a good achievement in your Raspberry Pi learning 🙂
Ask questions if you get issues somewhere, I’ll try to help you